GTM Configuration
Overview
Google Tag Manager (GTM) is a free tool that allows you to manage and deploy analytics and marketing tags (snippets of code or tracking pixels) on your website or mobile app without modifying the code directly. GTM simplifies tag management, improves site performance, and enables faster deployment of tracking codes.
Key Components of GTM
Tags: Snippets of code (e.g., Google Analytics, Facebook Pixel) that perform a specific function.
Triggers: Conditions that determine when and where tags should be fired.
Variables: Used to store and retrieve dynamic values.
Step-by-Step Setup Guide
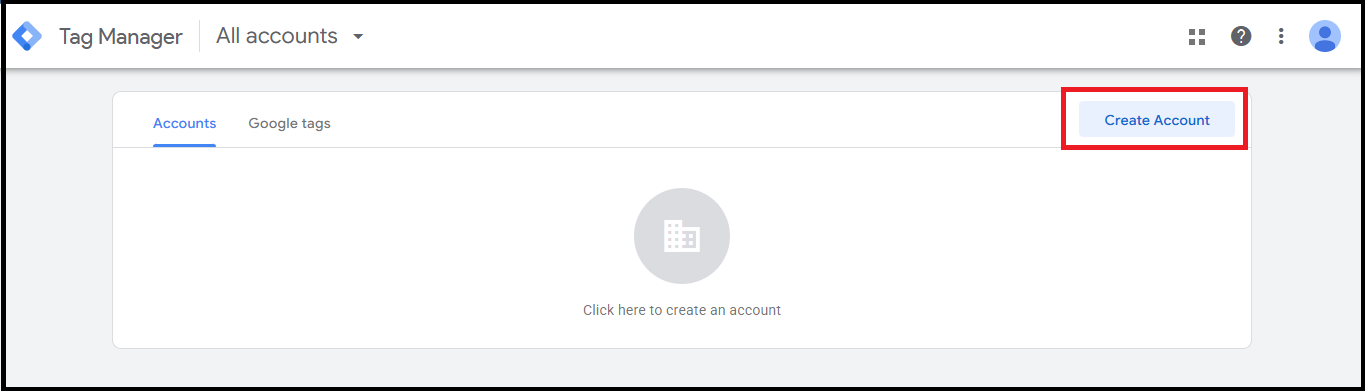
Step 1: Create a Google Tag Manager Account
Click "Create Account".
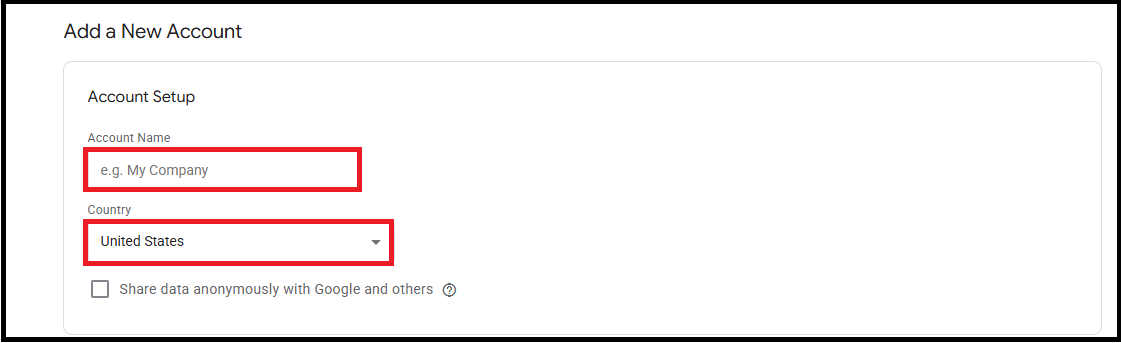
Enter your Account Name (usually your company name).
Choose your Country.
Enter a Container Name (usually your website name).
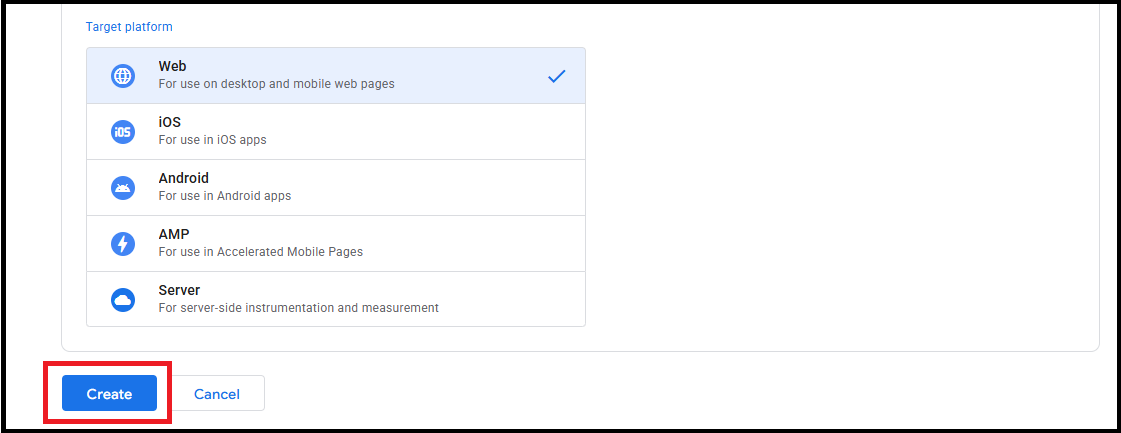
Select the Target Platform (Web, iOS, Android, AMP).
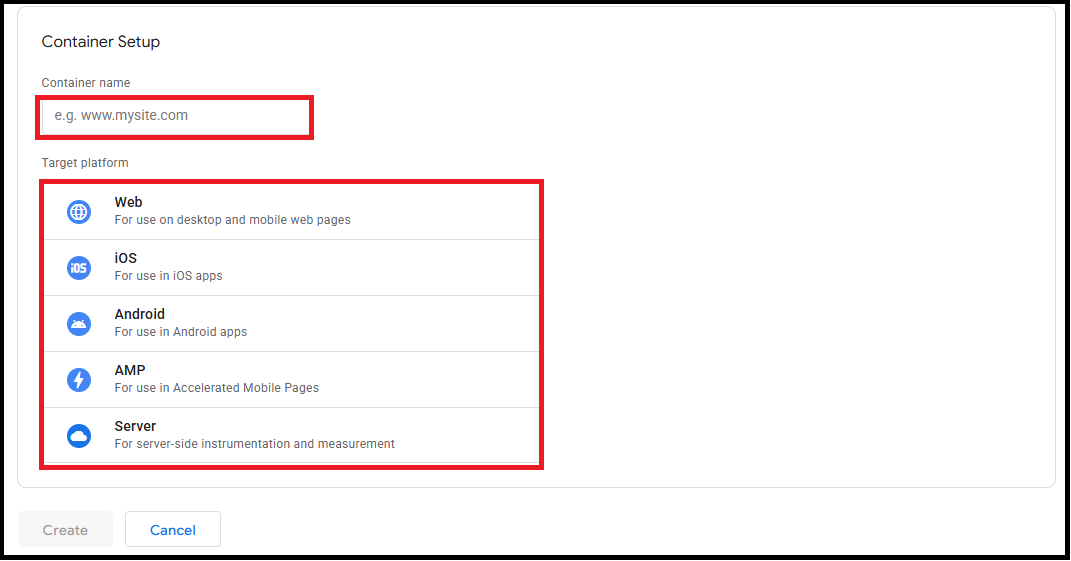
- Click "Create" and accept the Terms of Service.
Step 2: Install GTM on Your Website
After creating the container, GTM will provide two code snippets:
One for the head section.
One for the body section.
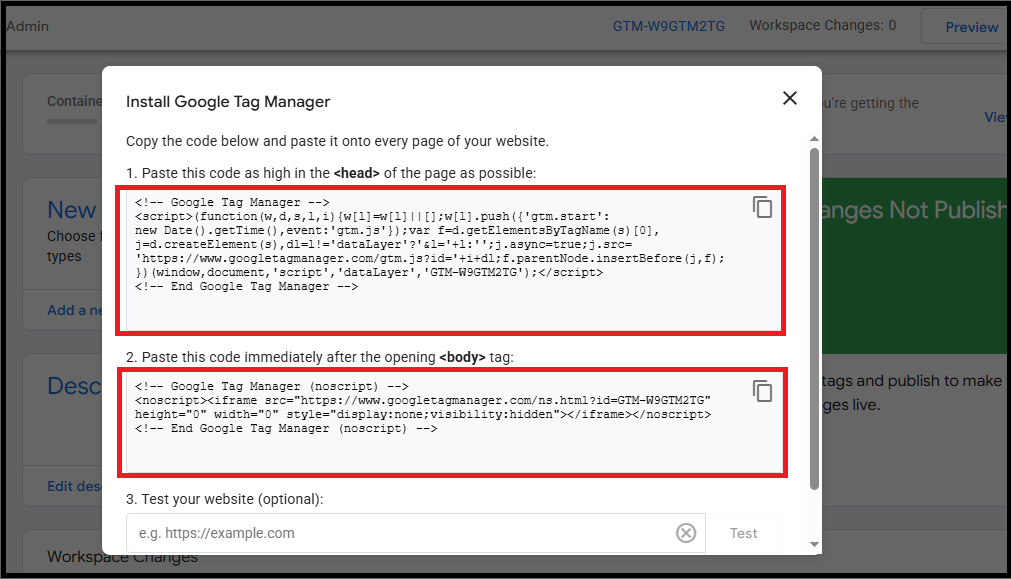
Copy and paste these snippets into your website's HTML:
Paste the first snippet immediately after the opening head tag.
Paste the second snippet immediately after the opening body tag.
Save and publish your website changes.
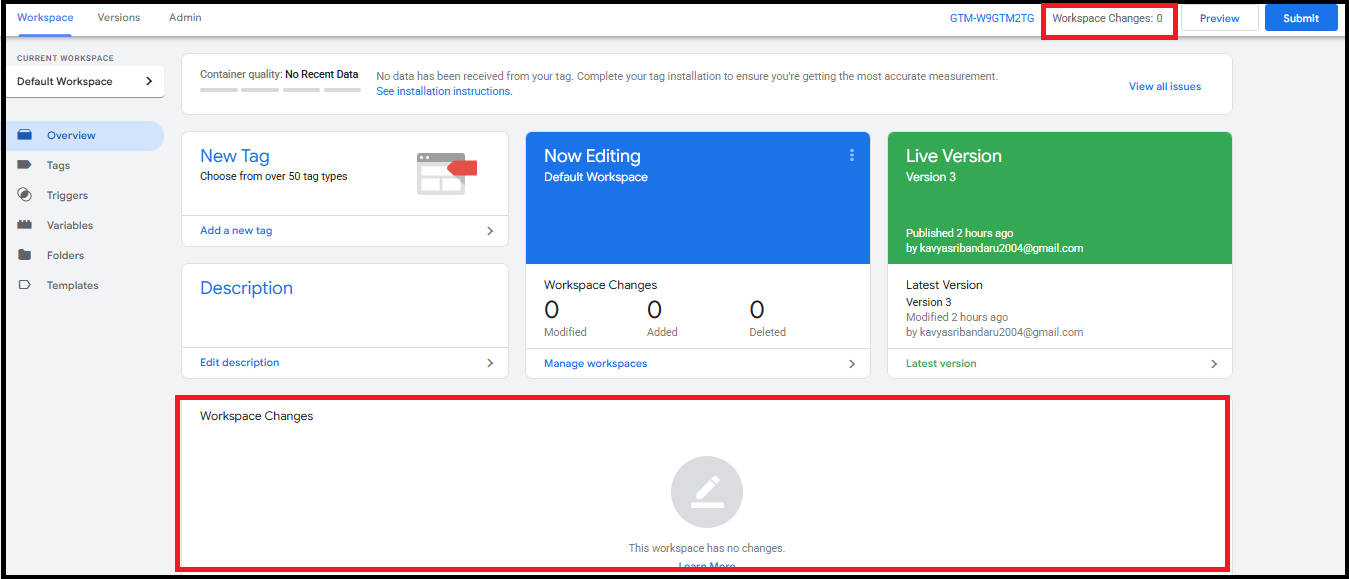
Step 3: Access the GTM Workspace
Log in to GTM and select your container.
You'll be taken to the Workspace, where you can create and manage tags, triggers, and variables.
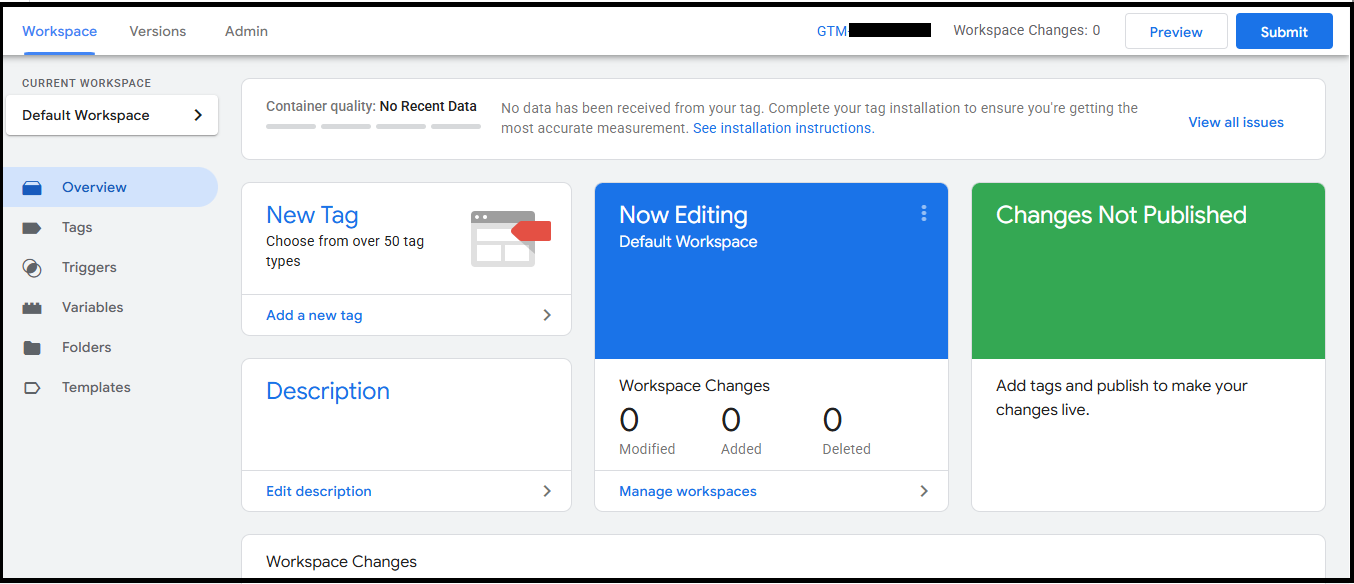
The Workspace Changes section in GTM tracks all modifications made within the current workspace before they are published. This includes:
Added: New tags, triggers, or variables created.
Modified: Existing items that have been edited.
Deleted: Items removed from the container.
Configuring Tags and Triggers
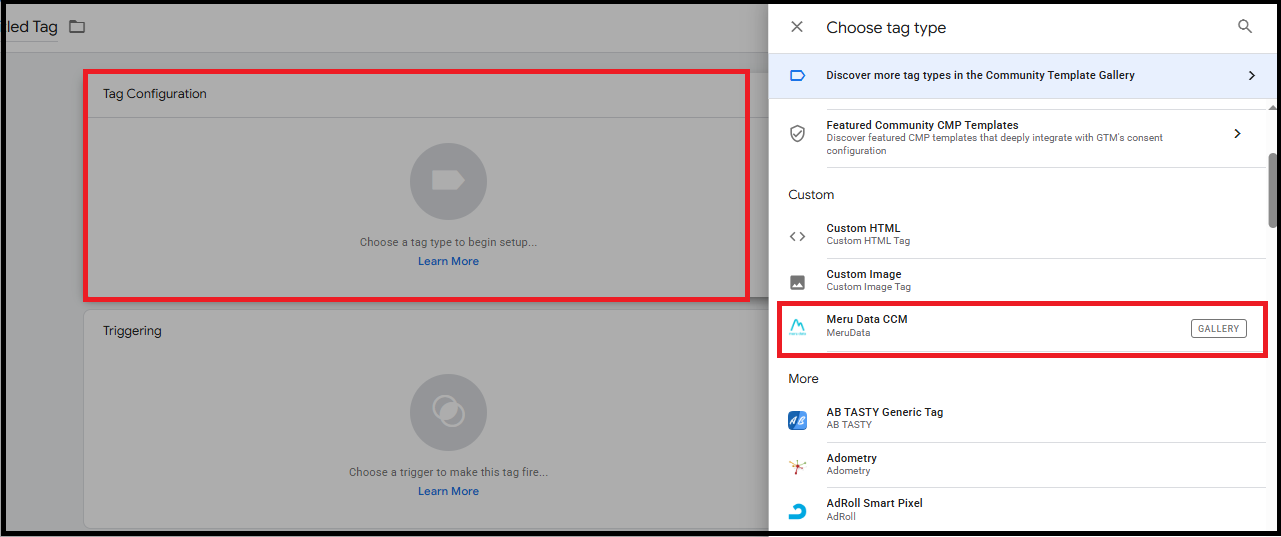
Step 4: Add a Tag Template from the Gallery
- In the left sidebar, click "Templates".
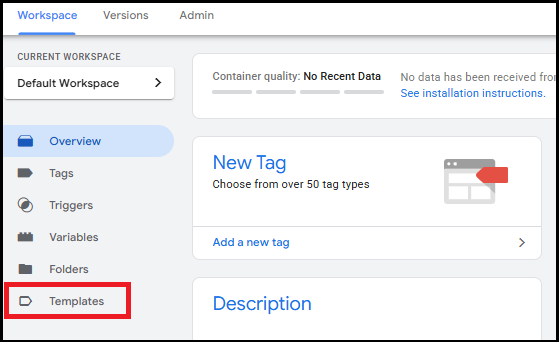
- Under the Tag Templates section, click "Search Gallery".

A side panel titled "Import Tag Template" will open.
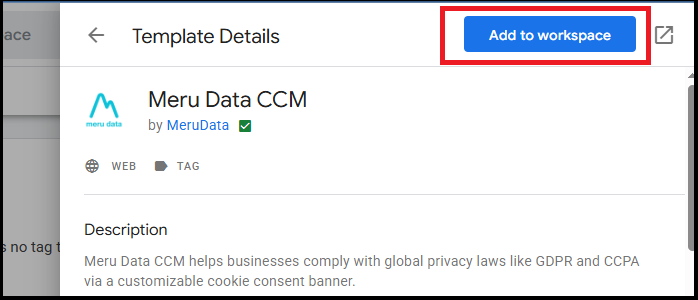
Use the search icon beside the heading to enter the name of the desired template (e.g., Meru Data CCM).
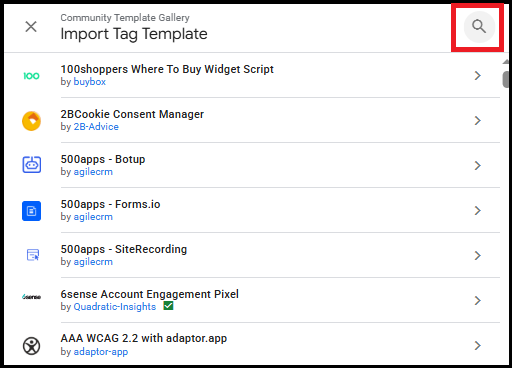
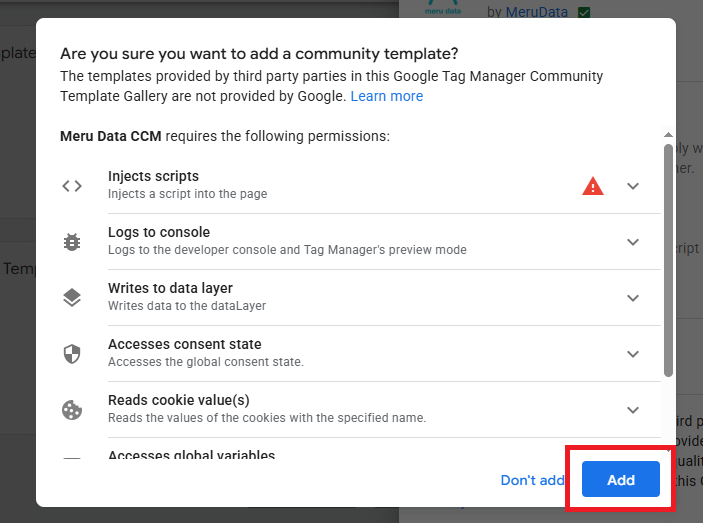
- Once found, click "Add to Workspace".
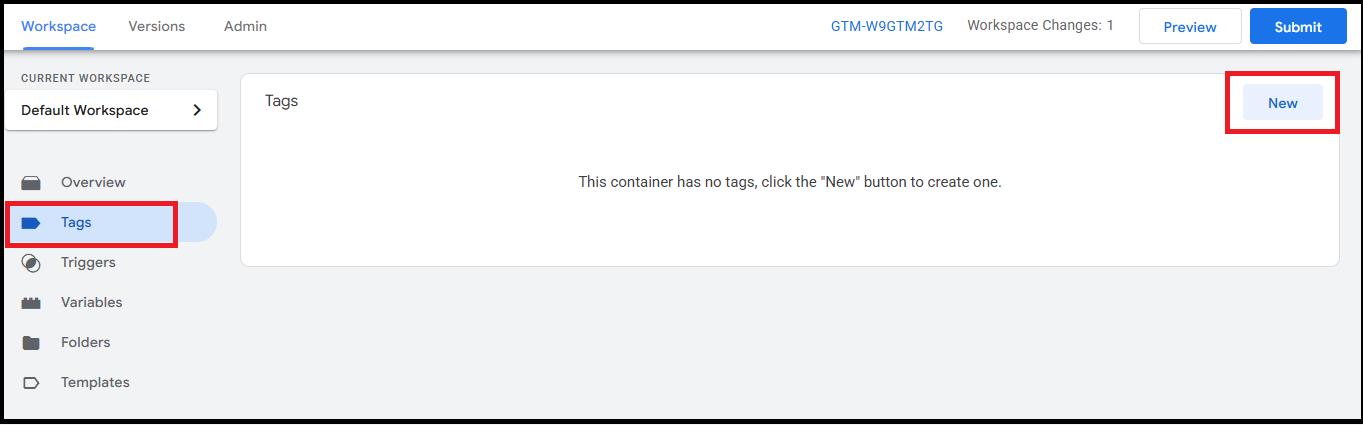
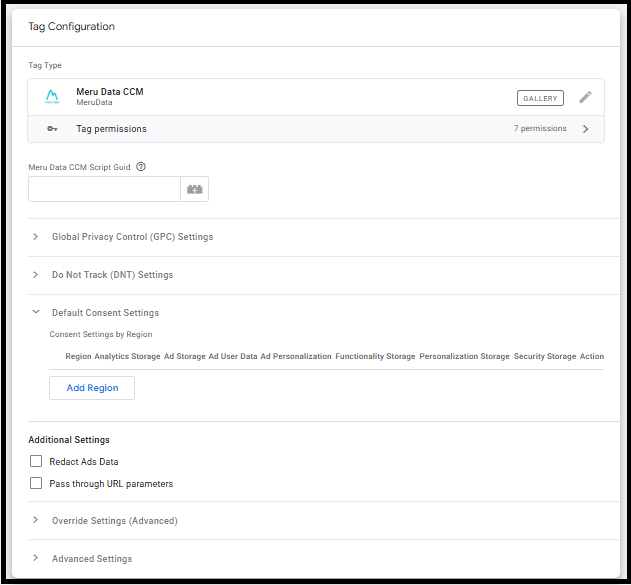
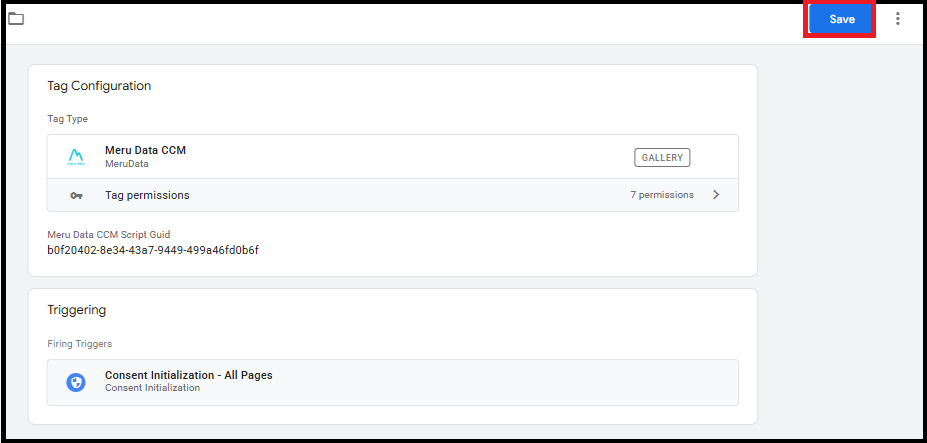
Step 5: Create a New Tag Using the Added Template
In the left sidebar, click "Tags".
Click "New".
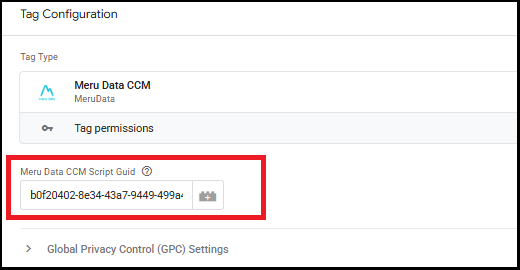
In the tag configuration panel, click "Tag Configuration".
Scroll down to the Custom section.
Select the tag template you just added.
- Fill in the required tag settings (e.g., Meru Data CCM Script Guid).
Steps to Retrieve GUID from Cookie Settings in DGT
Log in to your Data Governance Tool (DGT) dashboard.
In the left-side panel, locate and click on "Cookie Settings".
From the list of websites shown in the left panel, click on your website.
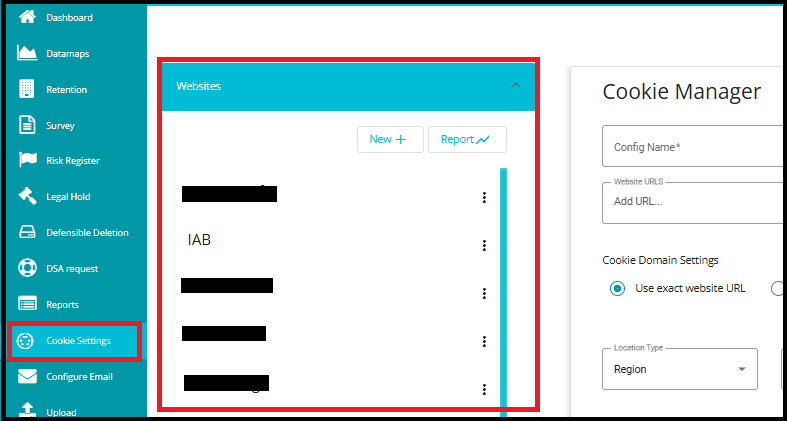
This will open the configuration options for that specific site.
Click on the "Configuration Script" option.
The script will automatically be copied to your clipboard.
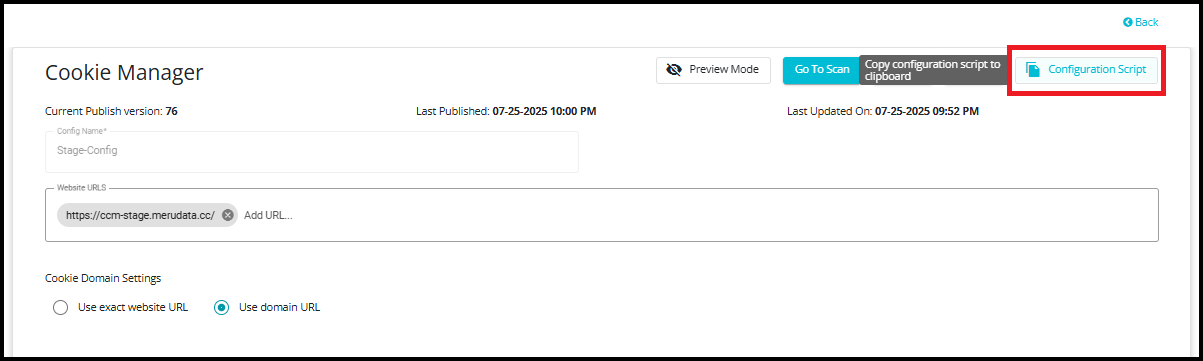
Open a text editor like Notepad or VS Code.
Paste the copied script into the editor.
In the pasted script, look for script tags.
Within these script references, you'll find a GUID string.
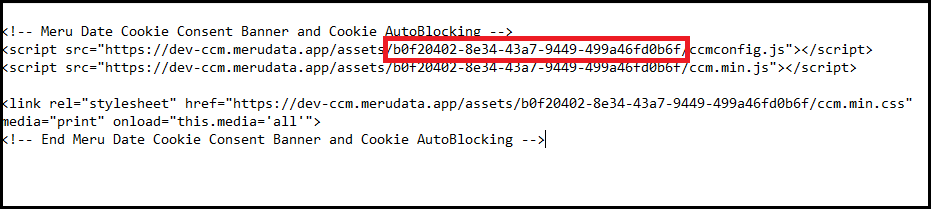
- You can now use this GUID for Tag configuration in GTM.
Global Privacy Control (GPC) Support
The Meru Data CCM template is designed to automatically honor user privacy preferences by supporting Global Privacy Control (GPC) signals. When GPC is enabled in a user's browser, the system detects these signals and enforces compliance without requiring additional manual configuration. This ensures that organizations respect opt-out requests for data sharing and tracking in alignment with privacy regulations such as CCPA and GDPR, thereby strengthening trust and reducing compliance risk.
Configure GPC in Template
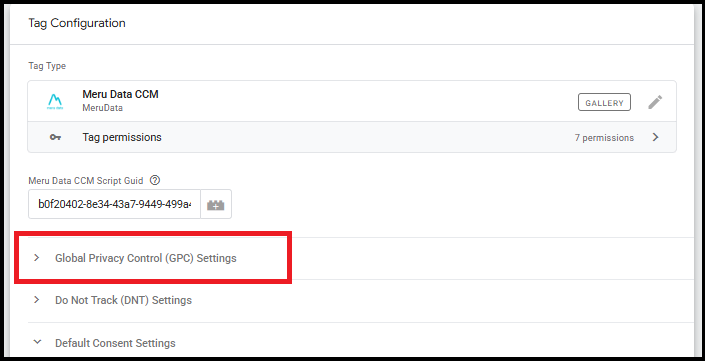
- In the Meru Data CCM template configuration, expand "Global Privacy Control (GPC) Settings."
- Enable GPC: Check "Enable Global Privacy Control" to activate GPC support.
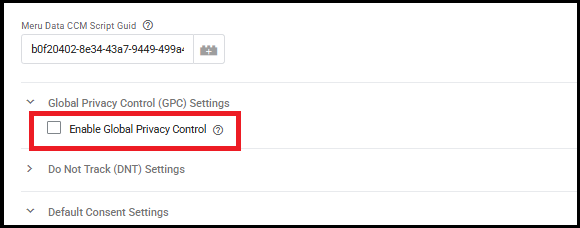
- After enabling the Global Privacy Control (GPC) checkbox, you must configure the GPC Detection Variable.
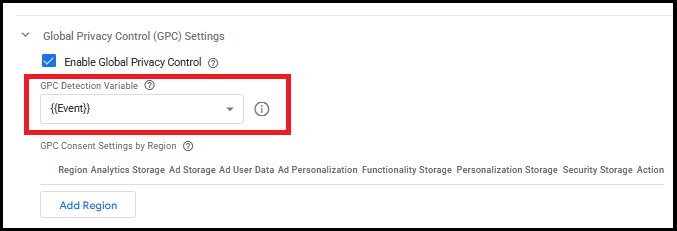
- To create a GPC Detection Variable, click on the dropdown menu and select New Variable.
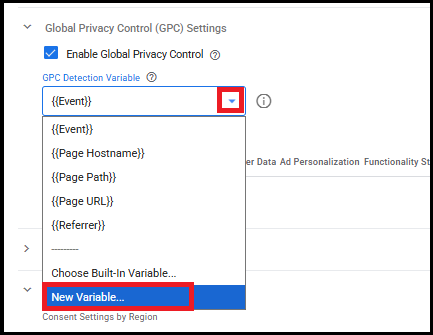
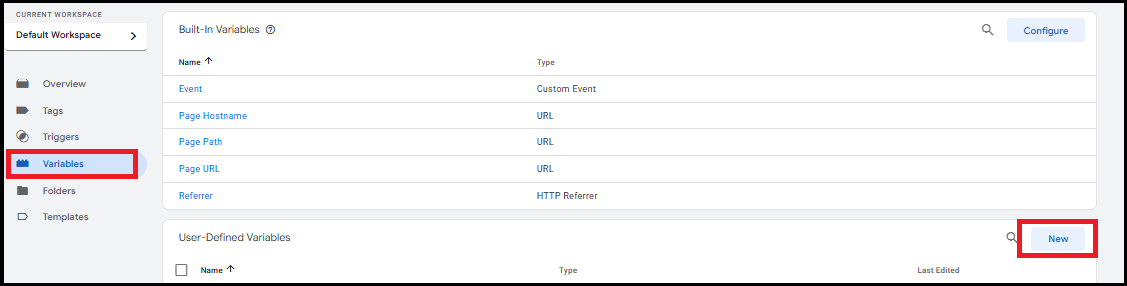
- Alternatively, you can create a new variable through the Variables section.
Navigate to Variables in your tag manager, then under User-Defined Variables, click New.
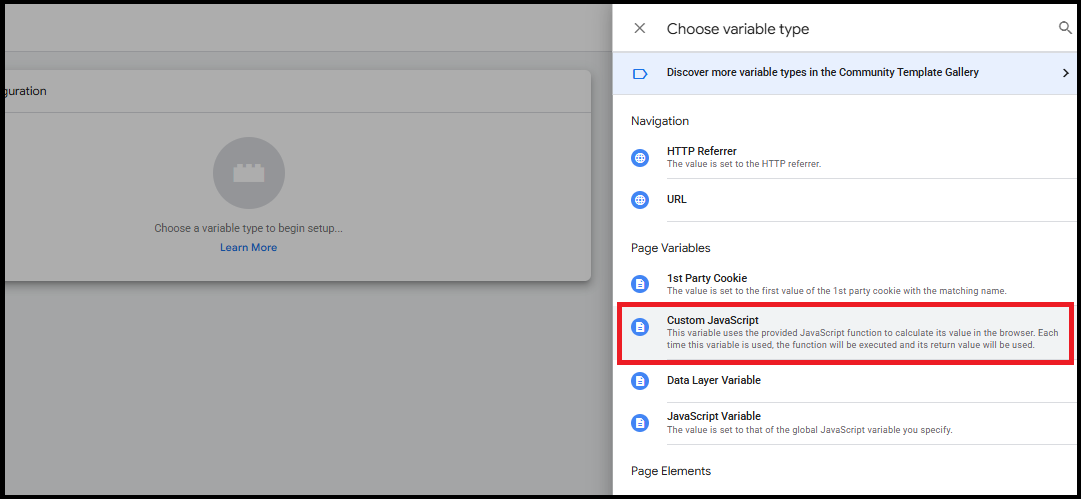
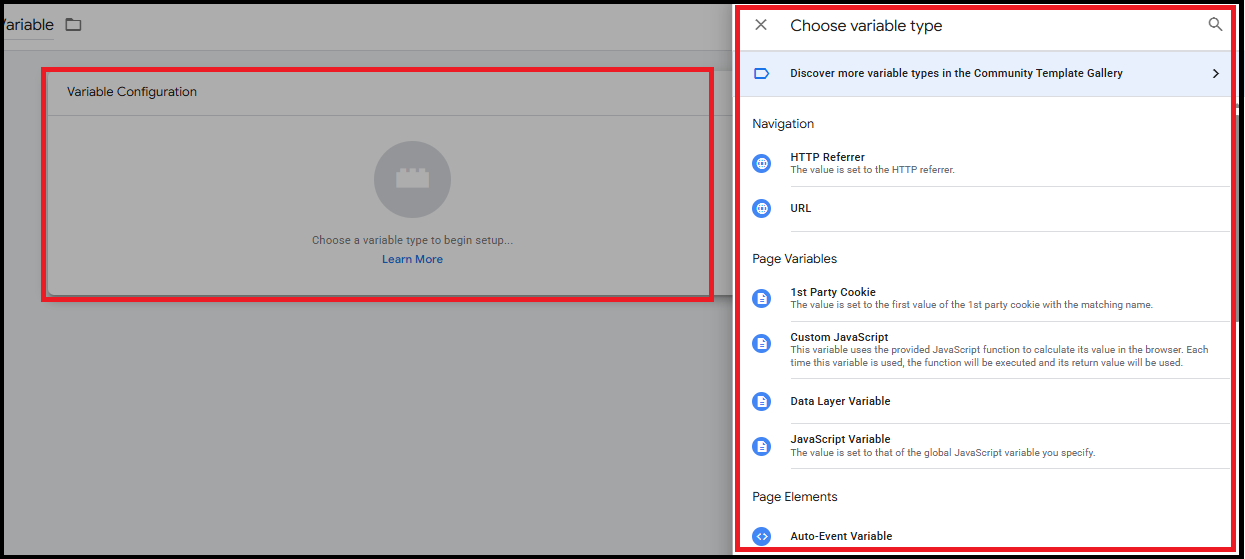
- Click on the edit (pencil) icon in the top-right corner of the Variable Configuration box. This will allow you to choose the variable type.
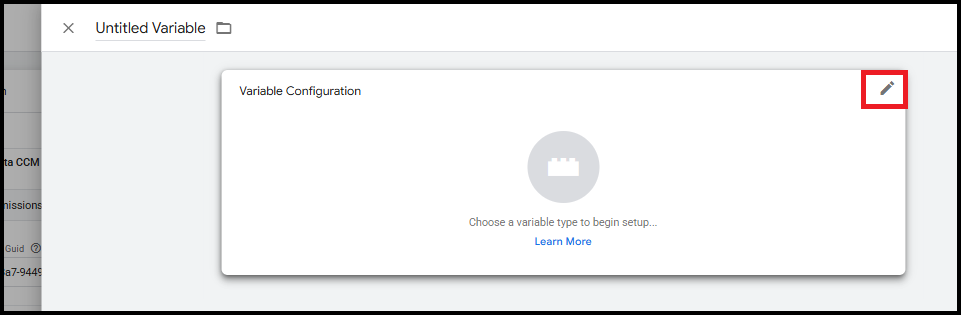
- Choose the variable type as Custom JavaScript.
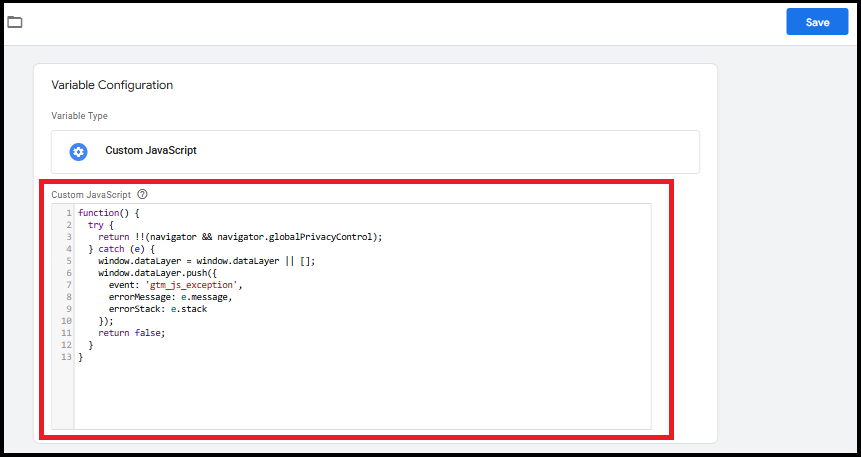
- Enter the Custom JavaScript code.
- Name the variable and click Save.
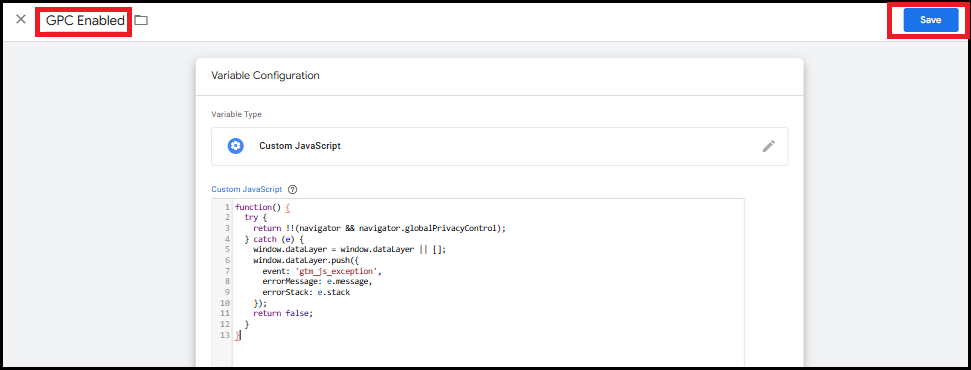
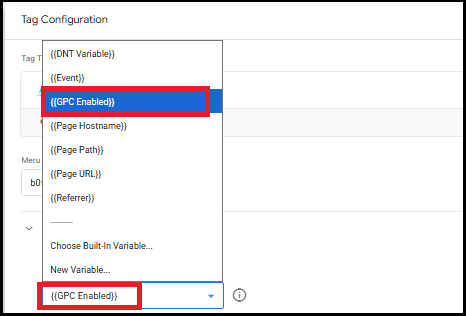
- Set "GPC Detection Variable" to {{GPC Enabled}}.
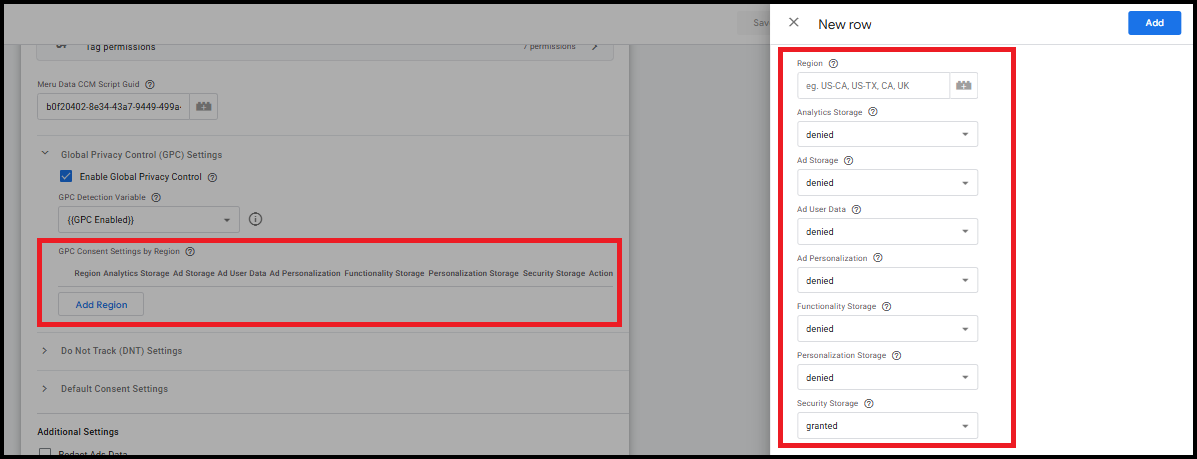
- Configure "GPC Consent Settings by Region" table:
a. Region: Enter region codes (e.g., US-CA, US-TX, CA, UK) or leave empty for global settings.
b. Consent Categories: Set each category to granted or denied when GPC is detected.
c. Default Behavior: If no configuration is provided, all categories except security storage will be denied when GPC is detected.
d. CCPA Compliance: For California compliance, consider setting all ad-related categories to denied.
NOTE: GPC support is completely optional. If you don't need GPC functionality:
Simply leave "Enable Global Privacy Control" unchecked.
The template will function normally without any GPC processing.
No performance impact when disabled.
Legacy Do Not Track(DNT) Support
The template also includes support for the legacy Do Not Track (DNT) standard, ensuring broader browser compatibility. By honoring DNT signals, the system provides an additional layer of privacy compliance, complementing modern standards like Global Privacy Control (GPC) and reinforcing user trust across diverse environments.
Configure DNT in Template
- In the Meru Data CCM template configuration, expand "Do Not Track(DNT) Settings."
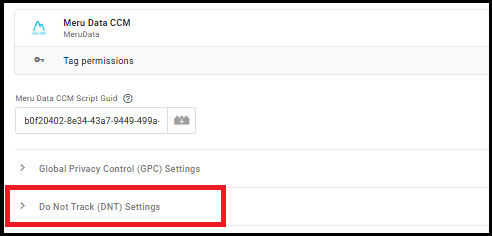
- Enable DNT: Check "Enable Do Not Track" to activate DNT support.

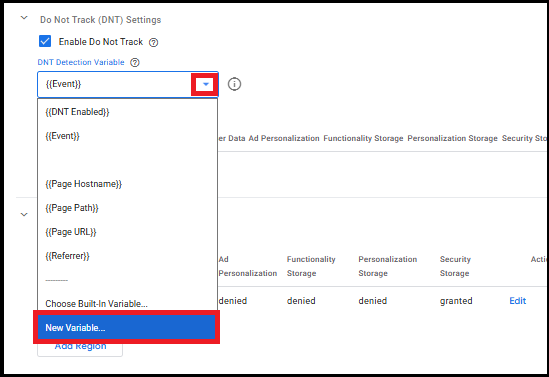
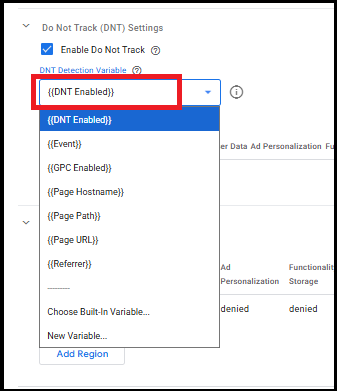
After enabling the Do Not Track (DNT) checkbox, you must configure the DNT Detection Variable.
To create a DNT Detection Variable, click on the dropdown menu and select New Variable.
- Click on the edit (pencil) icon in the top-right corner of the Variable Configuration box. This will allow you to choose the variable type.
- Choose the variable type as Custom JavaScript.
- Enter the Custom JavaScript code.
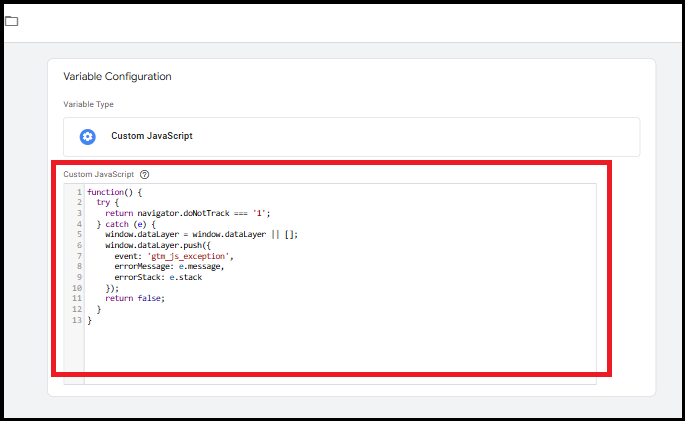
- Name the variable and click Save.

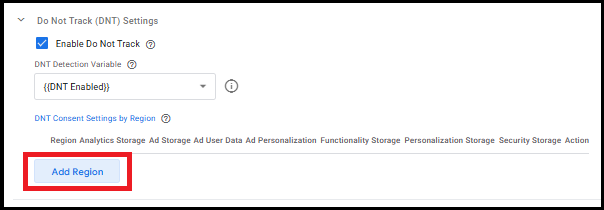
- Set "DNT Detection Variable" to {{DNT Enabled}}.
Configure "DNT Consent Settings by Region" table:
a. Region: Enter region codes (e.g., US-CA, US-TX, CA, UK) or leave empty for global settings.
b. Consent Categories: Set each category to granted or denied when DNT is detected.
c. Default Behavior: If no configuration is provided, all categories except security storage will be denied when DNT is detected.
NOTE: DNT support is completely optional. If you don't need DNT functionality:
Simply leave "Enable Do Not Track" unchecked.
The template will function normally without any DNT processing.
No performance impact when disabled.
NOTE: When both GPC and DNT are enabled:
GPC takes priority: GPC is a stronger, legally binding signal.
DNT as fallback: DNT preferences only apply if GPC is not active.
Clear compliance: Ensures legal requirements are met while maximizing privacy coverage.
Default Settings
Default settings allow you to predefine configurations that apply automatically based on specific conditions, such as region.
These settings streamline tag management and reduce manual effort for repetitive configurations.

Add New Default Setting
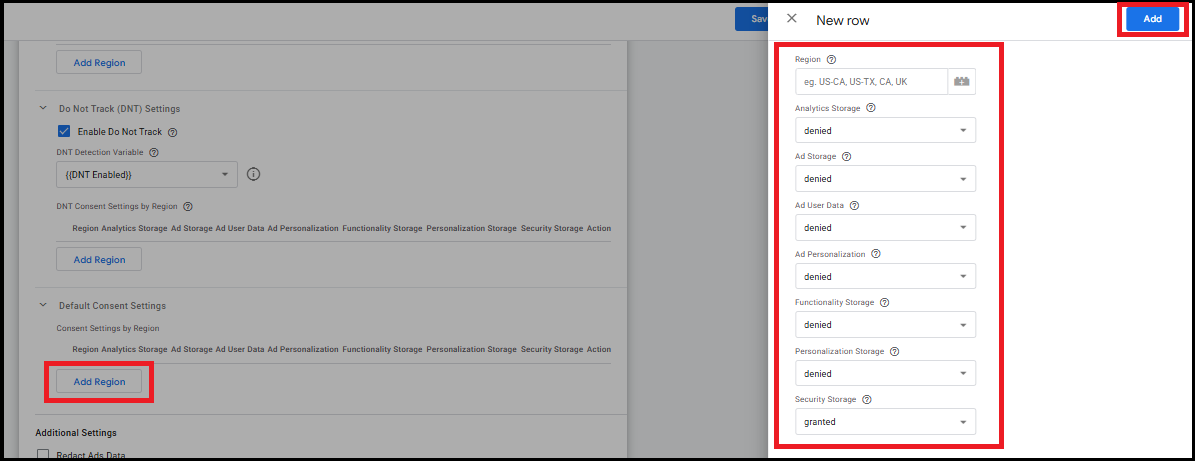
Click "Add Region".
A side panel will appear where you can:
Enter Region Code using ISO 3166-2 format, which includes:
- Country codes (e.g., US, UK)
- Subdivision codes (e.g., US-CA for California)
Enter relevant settings (e.g., Add Storage: Denied, Security Storage: Granted).
Click the "Add" button on the top right to save the configuration.
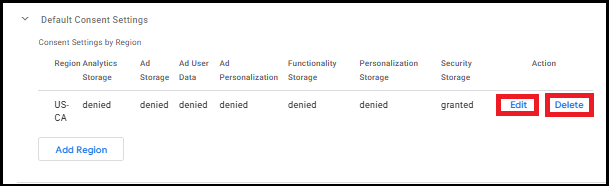
Edit: Click Edit to open the side panel and modify the existing default settings (e.g., change region or update cookie preferences like Analytics Storage, Security Storage, etc.). Save changes to apply the updates.
Delete: Click Delete to remove the selected default setting row completely. This action deletes the configuration for that region.
- Click "Triggering" to assign a trigger to the tag.

Step 6: Create a Trigger
- In the Triggering section, click "+" to add a new trigger.

Choose a trigger type.
The trigger must always be Consent Initialization. It ensures your tag executes first, so the default consent state is applied before any other tags run.
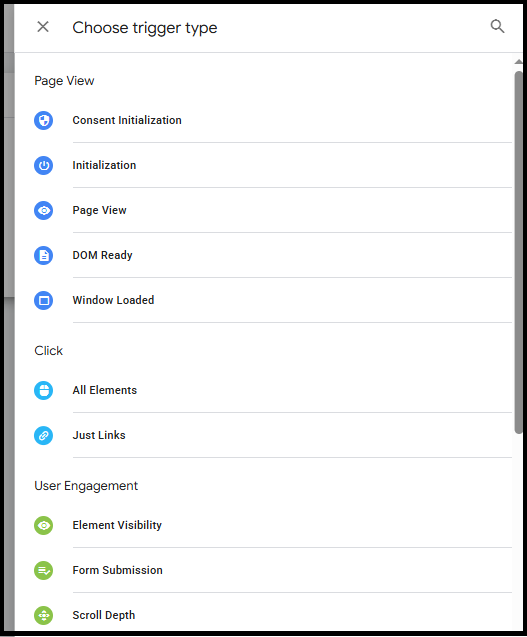
- Save the trigger.
Step 7: Preview and Test
- Click "Preview" in the top right corner of the Workspace.

- Enter your website URL and click "Connect."
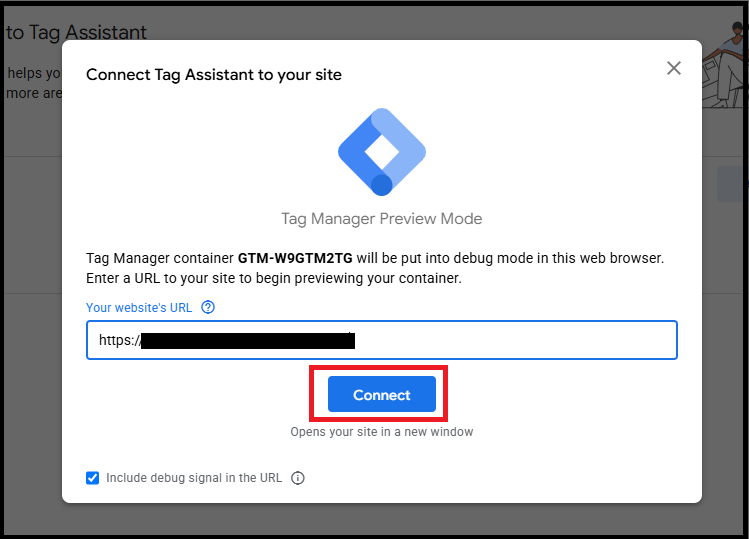
- A debug console will appear on your site showing which tags are firing.
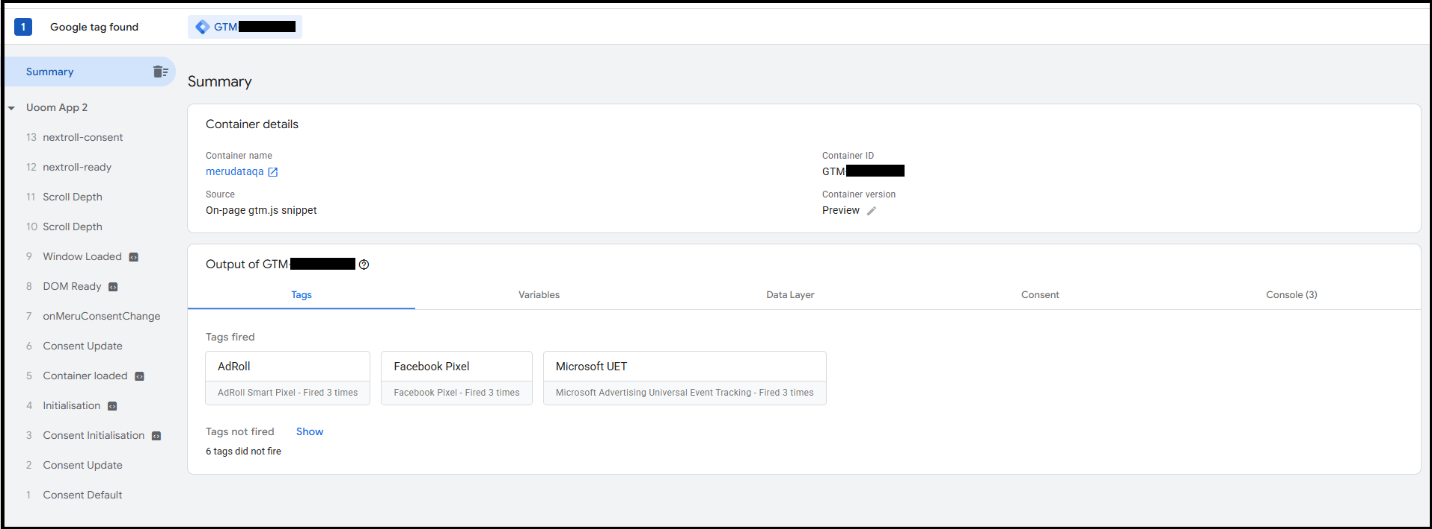
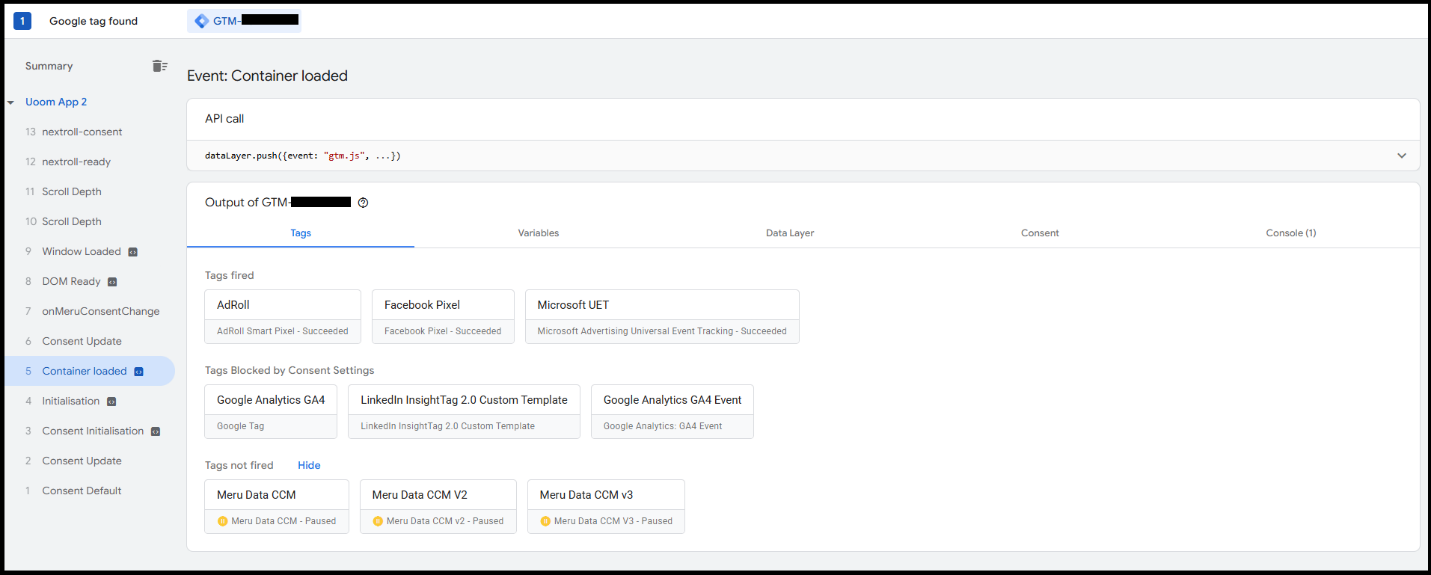
- Test your tags and triggers to ensure they work as expected.
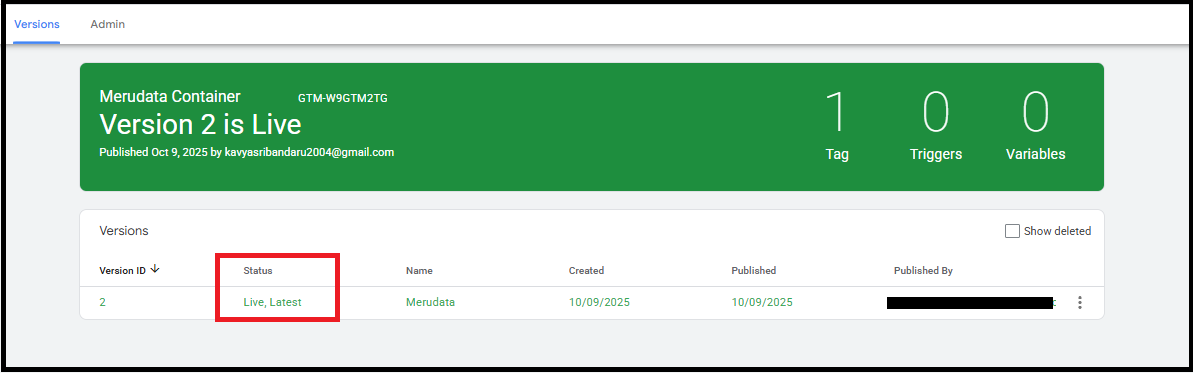
Step 8: Publish Your Container
- Once everything is tested, click "Submit" at the top right.

- Add a Version Name and Description.
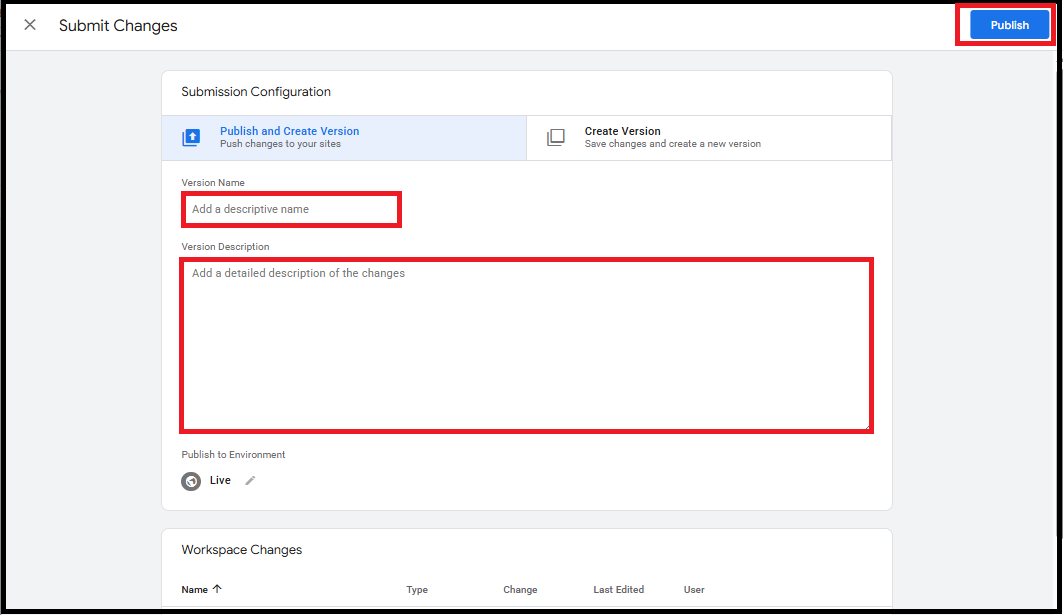
- Click "Publish" to make your changes live.
Optional: Set Up Variables
Go to Variables on the left sidebar.
Click "New" to create a variable.
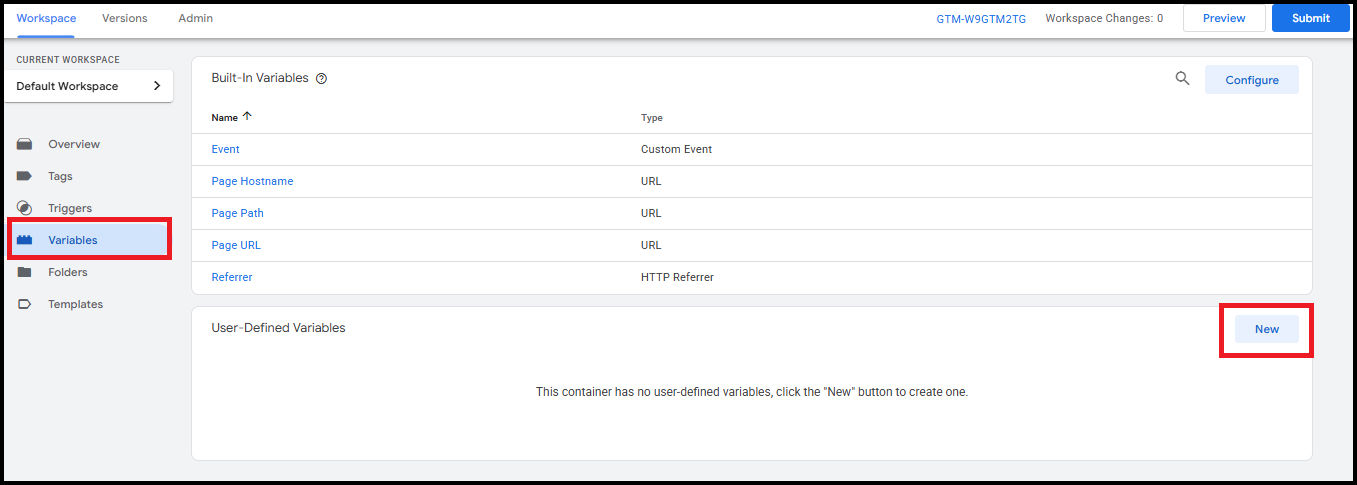
- Choose a variable type (e.g., Navigation, Page variables, etc.).
- Use variables to make your triggers and tags more dynamic.
Conclusion
With GTM, you can manage all your tracking codes in one place, making your website cleaner and easier to maintain. Regularly preview and test your tags to ensure accurate data collection.